


Let's Learn about DOM Manipulation
DOM Manipulation means adding elements to your page. There are many ways to do it.
Let's Start
In the above embed you can see the HTML structure. We can select body and append elements to it.
Appending Strings to Body Tag
const body = document.body;

// we can append strings too

body.append("Hello World")

// but if we do this

// body.appendChild("Hello World")
// error in console

The difference between append and appendChild is we can append string with append function but with appendChild we need to append Nodes like div, span , anchor , p tags.
Appending Elements to Body Tag with append
const body = document.body;
const div = document.createElement("div");

div.innerText = "Hello World"

// div.textContent = "Hello World 2"

body.append(div)

Both innerText and textContent will show the same output.
But here is a Catch!
There is a difference between innerText and textContent
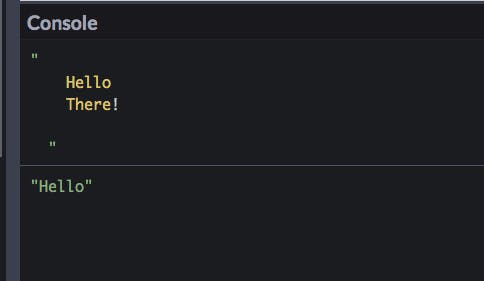
While viewing the element through innerText and textContent. When you console.log the textContent will print all the content either it contains spaces, indentation and all the content inside div whereas innerText will shows the current value of the div that it contains.
// in HTML embed code above add div
//  <div>
//    <span>Hello</span>
//    <span style="display : none;">There!</span>

//  </div>

const div = document.querySelector("div");

console.log(div.textContent);
console.log(div.innerText);
Appending Elements to Body Tag with innerHTML
const body = document.body;

const div = document.createElement("div");

div.innerHTML = "<strong>Hello World</strong>"

body.append(div)

if user generated content added through innerHTML , malicious code can be injected popularly to be known as Cross Site Scripting Attack.
To overcome this... Use innerText
const body = document.body;

const div = document.createElement("div");

const strong = document.createElement("strong")

strong.innerText = "Hello World"

div.append(strong)

body.append(div)
Output will be the same as above. You can check CodePen Embed Link
Removing Elements
For removing elements from a particular element we use remove()
// in HTML embed this code
//  <div>
//    <span id="hello">Hello</span>
//    <span id="there">There!</span>

//  </div>

const body = document.body
const div = document.querySelector("div");
const hello = document.querySelector("#hello");
const there = document.querySelector("#there");

//To Remove The Element
there.remove();

//To append the same element
div.append(there);

Access Element Attributes
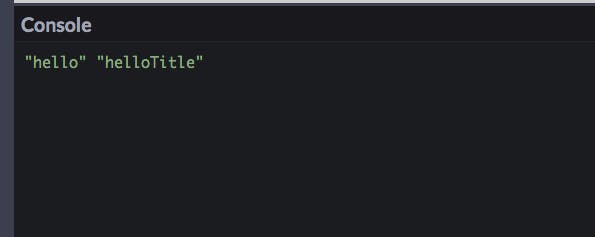
For accessing or modifying element attributes for a particular element we use getAttribute() or we can access attributes directly. Let's see..
// in HTML embed this code
//  <div>
//    <span title="helloTitle" id="hello">Hello</span>
//    <span id="there">There!</span>

//  </div>

const body = document.body
const div = document.querySelector("div");
const hello = document.querySelector("#hello");
const there = document.querySelector("#there");

console.log(hello.getAttribute("id"),hello.getAttribute("title"))

//OR

console.log(hello.id,hello.title)
Setting Element Attributes
For accessing or modifying element attributes for a particular element we use setAttribute() or we can access attributes directly. Let's see..
// in HTML embed this code
//  <div>
//    <span title="helloTitle" id="hello">Hello</span>
//    <span id="there">There!</span>

//  </div>

const body = document.body
const div = document.querySelector("div");
const hello = document.querySelector("#hello");
const there = document.querySelector("#there");

console.log(hello.setAttribute("title","newTitle"),hello.setAttribute("id","newId"))

//OR

console.log(hello.id = "newId",hello.title = "newTitle")

Accessing Data Attributes
For accessing data attributes for a particular element we use data-set as an attribute in the element
// in HTML embed this code
  <div>

    <span title="helloTitle" data-test ="this is a test" data-longer-name=" data longer text" id="hello">Hello</span>
    <span id="there">There!</span>

  </div>

// in script
const body = document.body
const div = document.querySelector("div");
const hello = document.querySelector("#hello");
const there = document.querySelector("#there");

console.log(hello.dataset)

hello.dataset.newName ="CodePen"
newName will be added in the element as an attribute.


Accessing ClassList
For accessing ClassList for a particular element we use classList property
// in HTML embed this code
  <div>

    <span class="hello1 hello2 " id="hello">Hello</span>
    <span id="there">There!</span>

  </div>

// in script
const body = document.body
const div = document.querySelector("div");
const hello = document.querySelector("#hello");
const there = document.querySelector("#there");

//To Add
hello.classList.add("new-class")

//To Remove
hello.classList.remove("new-class")

//To Toggle
hello.classList.toggle("new-class-3")
Toggle a class will remove the class if exist already or it will add the class if not.

Modifying Styles
For accessing ClassList for a particular element we use classList property
// in HTML embed this code
  <div>

    <span class="hello1 hello2 " id="hello">Hello</span>
    <span id="there">There!</span>

  </div>

// in script
const body = document.body
const div = document.querySelector("div");
const hello = document.querySelector("#hello");
const there = document.querySelector("#there");

//To Access Style
hello.style.backgroundColor = "red"
To modify styles you can use camelCase syntax and access that style and modify it accordingly

That's It For Now. See You In Next One ✌️